How to Allocate More RAM to Minecraft: Hey friends, your friend Steven is back again today article may become the holy grail for gamers. Yes, today we are going to talk about a game that is liked by many players due to its simplified gameplay but still the game lags. You are fed up with the issue this happens due to lesser ram allocation to Minecraft and today we are going to guide you to ram allocation process so without any further ado lets start.
Your gameplay in Minecraft lags due to a lot of things happening in the background you may have encountered a sudden crash lag this mainly occurs when you are playing Minecraft with Redstone heavy builds, and the issue becomes hard to bear up when you mix mods in your gameplay the amount needed to run your gameplay increases, and you have to suffer from frequent crashes and issues that make the game unplayable.
To counter this problem, you can allocate more ram to your Minecraft gameplay and we are going to guide you on the ways to do it.
ENOUGH RAM TO USE
You can quickly check how much ram does your personal computer or laptop has just follow the below steps and you are almost there.
• Click on the start icon on your desktop and then click on settings.
• When you are done you will get there an option called About.
• Under device, specification look for the ram option, you will see the amount of RAM you have to use.
However, Minecraft needs almost 2GB of RAM Minecraft says that the game needs 4GB of RAM for smooth gameplay if you have more RAM to spare then recommended then it is enough to soothe your thirst for smooth gameplay.
1) RAM ALLOCATION FROM DEFAULT LAUNCHER
1) You can allocate more RAM to Minecraft using the Minecraft default launcher.
2) Simply open the default launcher Minecraft and select in which version you want to play the game you get there two options (Bedrock or Java ).
3) Click on the installation option from the top. You will see an option called version, and you might see the latest version if you have not selected the version you want to play.
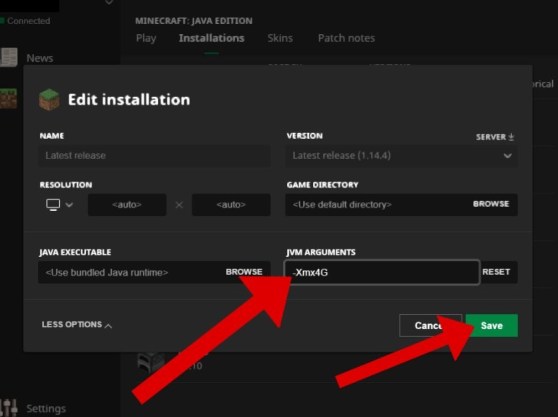
4) Take your cursor to edit the option and click on it.
A tab with the name edit installation appears.
When you are done with this step, click on more options and go down to JVM Arguments.
Here you will see that number of ram used by Minecraft is 2GB if you want to use all the ram available on your computer. You can do that and make Minecraft utilize all the ram available on your computer but it also depends on what task you are running in the background.
You can change the 2 as per your requirement you can look at the below image
Image
2 ) RAM ALLOCATION THROUGH ATL LAUNCHER
If you have a habit of using mods during your gameplay then you must be familiar with ATL launcher which is specially made for Minecraft. The ATL launcher is easy to set up because there are no codes so if you are enough familiar on how to use the computer then everything is very easy to set up. Below are the steps that are given on how to use ATL launcher for Minecraft.
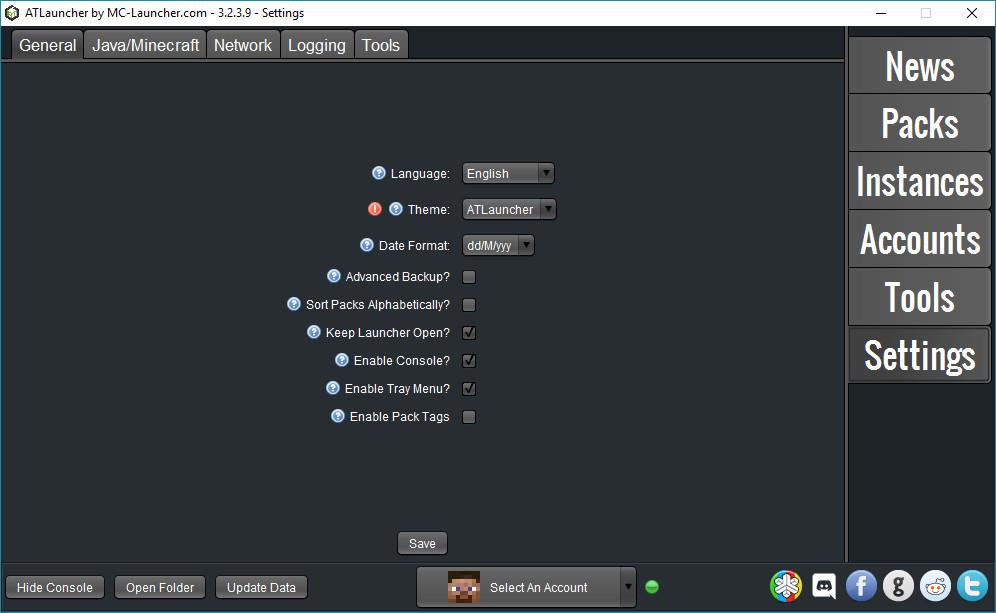
- Just launch the ATL launcher.
- At the right corner, there are options listed you will find an option called settings.
- At the top of the screen, there is an option JAVA/MINECRAFT.
- You will get there a list of options but your point of concern is the option called Maximum Memory / RAM just type the amount of ram you want to allocate to Minecraft or you can use the up-down arrow which increases or decreases the ram with the rate of 0.5 GB.
- If you use Mod in your gameplay then Minecraft may require more ram if you are playing the game on sky factory then the minimum requirement for playing your game is 4GB. If you will allocate lesser ram then recommended then your gameplay may come across frequent crashes. If all the things are done as said then click on Save and you are ready to rock.
3) RAM ALLOCATION THROUGH TWITCH / CURSE LAUNCHER
Using this launcher enables you to play Minecraft in a variety of Mods. Ram allocation is as easy as the above-mentioned launcher but the difference is in the initial setup below are the steps to use Twitch/ Curse Launcher.
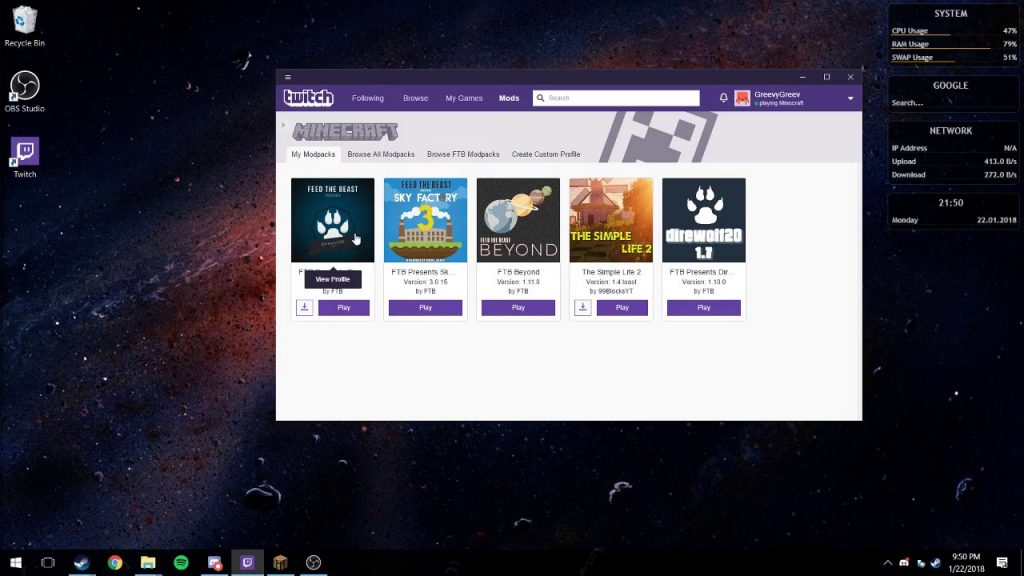
- Launch the Twitch/ Curse Launcher.
- Press CTRL + comma to open the settings.
- Then click on an option called Minecraft.
- Then scroll down to an option called JAVA settings.
- Then look for an option Allocated memory.
By default, the ram allocation to Minecraft is set as 3228 MB of ram.
you can move the slider to right or left to increase or decrease ram allocation to Minecraft. the ram allocation to Minecraft in Twitch/Curse launcher increases or decreases at the rate of 0.25 GB.
Above are the steps that are helpful in allocating more ram to Minecraft but before allocating ram we should always keep in mind that sparing your free ram on a game can decrease the overall performance of your computer. If your computer reports less ram availability on your computer then you can also increase the ram by purchasing it from the market for better performance.
Next Method:
Do you experience Bad Lagging Issue, Trying to play Minecraft beat Vanilla or Monitor Discount, Sometimes because by two little ramps allocated to the game leaving it without the end of overhead to possibly improve performance?
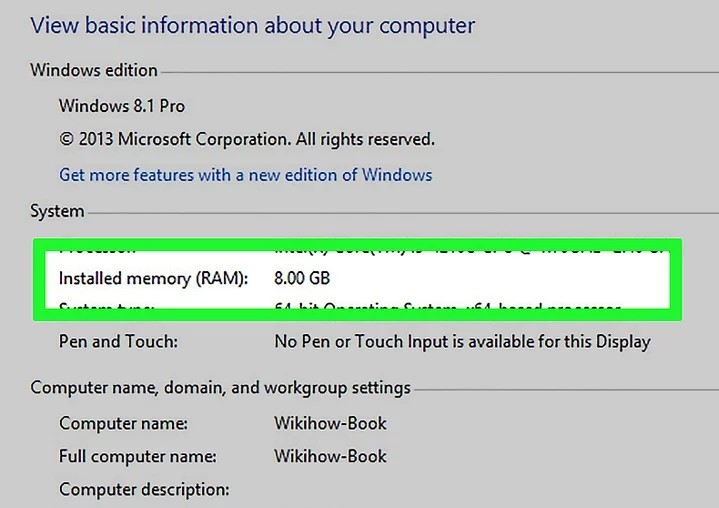
You can try Allocating more Memory to the game. It is important to know How Much RAM in your computer. Has at its disposal on PC Type CTRL SHIFT. Escape the Open Task Manager. You may need to click more details to get full access to this window then Click the Performance.
Tab to see How Much Memory or Ram is present in your computer in my case. Suppose I Have 16 Gigabytes. If your computer has less than 8 Gigabytes, I wouldn’t recommend increasing the RAM allocated to Minecraft. If it has 8Gigabytes or more you can Safely increase the Allocated amount of RAM.
I Will Show You How to do this Tough
Follow Instructions: When you Have Open to Minecraft Java Edition Launcher.
Step 1: Click on the installation Step, then Hover over the Instance. You want to allocate more RAM to if you play a modded version of Minecraft this installation will probably have a Name starting with Forge.
Step 2: Navigate to the Three Dots to the right of play in the drop-down Menu Select Edit. Step 3: Click More options to expand this Menu the JVM Arguments menu at the bottom of the list lets you specify the allocated memory to the game by default. The game has Access to 2 gigabytes because my computer has more than 8 Gigabytes of RAM.
I can safely allocate 4 Gigabytes to Minecraft increasing this value to more. 4 Gigabytes don’t make a noticeable difference in the season Recommended the only justifiable reason to those who is if you’re trying to play a huge Montague that runs a lot of heavy computational calculations per second just type in the value of 4 and click Save at the bottom.
- When you Next Boot Up, the game load is saved the world or Create a new one once loaded,
- Press F3 on your keyboard to open the Debug menu in the Top, Right you will see that the game now has access to more than 4000 Megabytes of ram which equals 4 Gigabytes. I hope this Article helped solve your lag issues.